1. Prepare the Area
Ensure the workspace is clean, dust-free, and well-ventilated.
Remove any flammable materials nearby since infrared heaters generate heat.
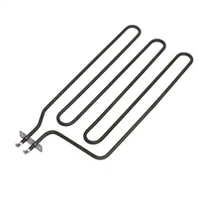
2. Choose the Right Heater
Select a ceramic infrared heater with adjustable temperature settings.
Confirm it's suitable for the size of the painted surface and the type of paint (e.g., automotive paint, wood finishes).
3. Position the Heater
Place the heater at an appropriate distance from the painted surface, usually 18-24 inches (45-60 cm).
Position the heater so the infrared rays evenly cover the entire painted area.
Avoid overheating one spot to prevent paint blistering or cracking.
4. Set the Temperature
Start with a low to medium temperature setting (typically between 120°F to 160°F or 50°C to 70°C).
If using automotive paint or industrial coatings, follow manufacturer recommendations for drying temperature.

5. Turn On and Monitor
Turn on the heater and monitor the surface regularly.
Maintain even heat distribution by moving the heater if necessary or using multiple heaters for larger areas.
Avoid direct contact of the heater with the surface.
6. Drying Time
Drying times vary by paint type, thickness, and ambient conditions.
Infrared drying can reduce drying times significantly, often cutting it by half or more compared to air drying.
Typically, 10-30 minutes is enough, but always check paint manufacturer specs.
7. Cooling Down
Once drying/curing is complete, turn off the heater and let the surface cool gradually.
Avoid sudden exposure to cold air or water, which can cause surface defects.
8. Safety Precautions
Always follow heater manufacturer instructions.
Use heat-resistant gloves if adjusting the heater during operation.
Ensure the heater is placed on a stable, non-flammable surface.
Keep children and pets away during operation.
E-Mail: Cici@Jaye-Heater.Com
Whatsapp: +86 13480586962