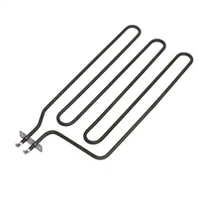
Here are the general steps to install a finned heating tube to a duct heater:
Turn off the power: Before starting any installation work, turn off the power to the duct heater and unplug it from the power source.
1-Remove the old heating element: If there is an existing heating element in the duct heater that needs to be replaced with the finned heating tube, remove it carefully according to the manufacturer's instructions.
2-Prepare the finned heating tube: Before installing the finned heating tube, ensure that it is the correct size and wattage for your duct heater. Check for any damage or defects in the tube and clean it if necessary.
3-Insert the finned heating tube: Carefully insert the finned heating tube into the duct heater, making sure that it is properly aligned and seated in the mounting bracket.
4-Secure the finned heating tube: Once the finned heating tube is in place, use the mounting hardware provided by the manufacturer to secure it to the duct heater. This may involve using screws or other fasteners to attach the tube to the mounting bracket.
5-Connect the wires: Connect the wires from the finned heating tube to the electrical connectors in the duct heater, making sure to follow the manufacturer's instructions and match the polarity correctly.
6-Turn on the power: After the finned heating tube is installed and the wires are connected, turn on the power to the duct heater and test the heating function to ensure that it is working properly.

It's important to refer to the manufacturer's instructions for specific guidance on installing a finned heating tube in a duct heater, as the process may vary depending on the duct heater model and the type of heating element being installed. Additionally, it's important to exercise caution and follow all safety procedures when working with electrical components.